...
Description: In In this topic, the user will learn how to create enter a Picture EVV punchpunch with picture EVV in the mobile app.
Role Required: Employee (base user)
Permission Required: N/A
Clock In on the Mobile App
Open the
...
DCI EVV app
Log in to
...
personal profile
Click
...
Clock In
...
...
If
...
the
...
Continue to
...
Clock Out button
...
is displayed instead of Clock In, this means the user did not clock out of
...
their last shift and
...
needs to complete
...
the clock out process before
...
clocking in again.
Complete the Clock In screen.
Client - If
...
only one client the field will auto-populate. If more than one client, click the field to select the appropriate client then click OK to confirm.
Service Code -
...
If only one service code the field will auto-populate. If more than one service code, click the field to select the appropriate service code then click OK to confirm.
Cost Center - The cost center will auto-populate
Click Continue
Click Confirm Clock In to
...
Cost Center - Cost Center will be filled out automatically. There is no action to take here.
...
Click the Continue button.
...
complete the clock in process.
...
The clock in screen will display a summary of
...
the clock in, including the authorization remaining balance if enabled.
...
To edit, click the
...
Back Arrow
...
to return.
Select EVV Location if applicable and click OK
Click Confirm Clock In
The clock in is now confirmed. Users may log out or close the
...
mobile app as it will not
...
be needed again until the end of the shift.
Clock Out on the Mobile App
...
Open the DCI EVV app
Log in to
...
personal profile
Click
Continue to Clockout
...
...
Click Confirm
Click Confirm through the alert
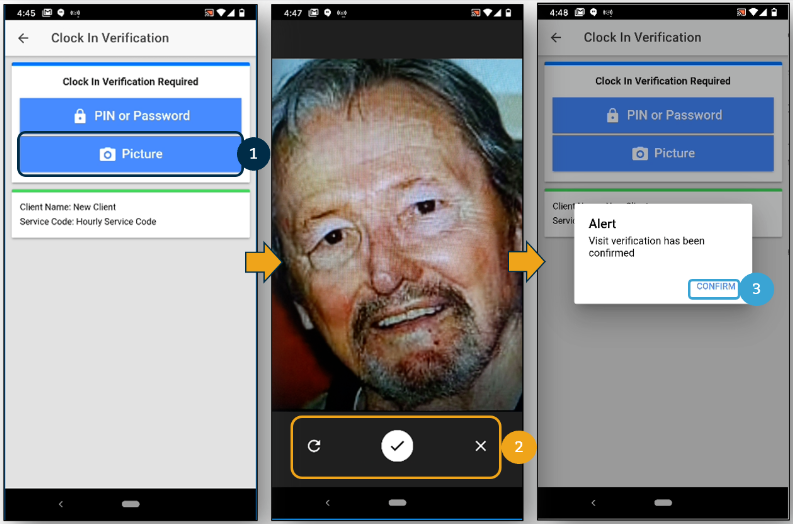
Click
Picture
The device camera
...
will open
Click the Camera icon to take the picture
Click the Check icon to
...
accept the picture
...
...
Click the Refresh icon
...
to retake the picture
Click the X icon
...
Click Confirm to validate the picture.
...
Add optional notes or attachments.
...
Once EVV verification has been completed, you are able to add notes and attachments from your visit.
...
to delete the picture
Click Confirm to validate the picture
Add Notes and/or Attachments (optional based on organization requirements)
Add notes functionality works using the device keyboard
...
. If talk-to-text is enabled as an option on
...
the mobile device,
...
the microphone feature may be used to enter
...
notes by
...
speaking.
Add
...
attachment allows a picture to be taken and
...
added to the note
...
Click
Confirm Clock Out
...
...
Shift details will be displayed
...
. Click Home to return to the
...
Picture EVV
...
Click Picture
The camera on your device will turn on.
...
Click the Check icon to take the picture.
To retake the picture click the Refresh icon.
To cancel taking a picture click the X icon.
...
dashboard.
Related articles
| Content by Label | ||||||||||||||||||
|---|---|---|---|---|---|---|---|---|---|---|---|---|---|---|---|---|---|---|
|
...