...
Description: Users In this topic, users will learn how to use DCI to supervise a residential program.
Roles Required: Super User, Supervisor
Permissions Required: Residential Program Admin
| View file | ||||
|---|---|---|---|---|
|
Contents:
| Table of Contents |
|---|
...
Description: In this topic, the user will learn an overview of the residential program profile. The residential program profile is designed to record absences for clients who reside at the program and record time for employees who work there. Typically, the person who works at the front desk will log in to the residential program profile at check in and check out, so that employees can easily log their attendance in the system and clients can record absences.
Profile Overview
Dashboard
The residential program dashboard displays news posts, which are important messages from the residential program. Click on other submenu options to check in or out, or view the schedule.

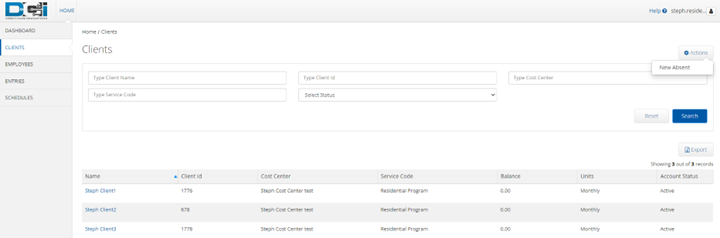
Clients
From this submenu tab, record an absence for a client. Click a client's name to open the details page.
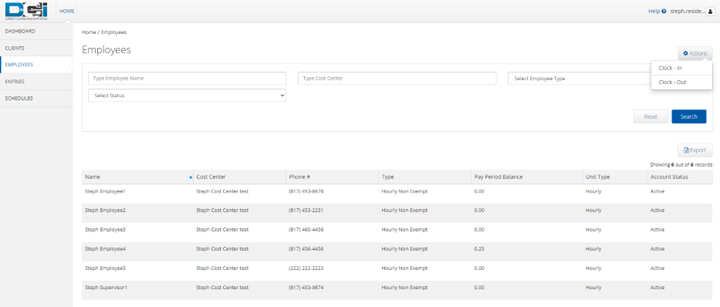
Employees
Here, an employee can clock in and out.
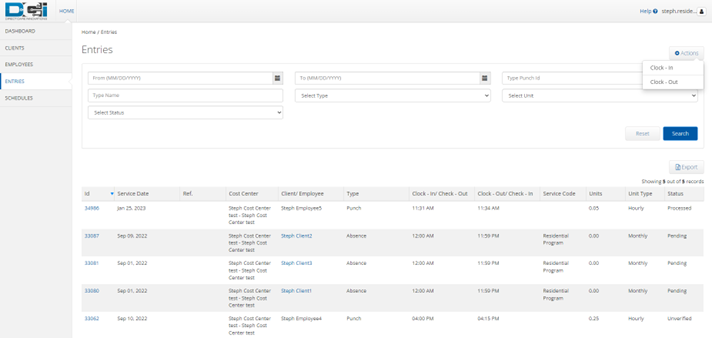
Entries
View program entries and details. Employees can also be clocked in and out from this page.
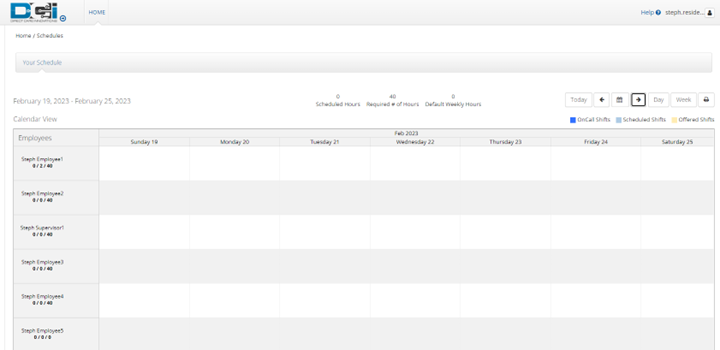
Schedule
View the program schedule. All edits are made from the super user or supervisor profile.
Edit Profile
Description: A residential program profile may be edited or updated by the supervisor (i.e., the profile is no longer in use and needs to be inactivated).
...
- Log in to DCI with personal profile
- Click Home on the main menu
- Click Residential Programs on the submenu
- Search for the program by typing the name in the field Type Residential Program Name and selecting it when it populates
- Click Search
- Select the program from the table by clicking anywhere in the row
- Click Actions
- Select New Employee Service Account from the drop-down menu
- Complete the form wizard
- Program Name – Auto populates
- Employee – Enter the employee name and select it from the drop-down menu
- Cost Center – Auto populates
- Employee Number (optional)
- Pay Rate Name (required) – Select from the drop-down menu
- Pay Rate (required) – Enter employee pay rate
- Effective Date - Click in the field to open the calendar and select a date
- Min Units Per Punch (optional) – Enter if a minimum number of billing units must be used when the employee clocks in under this service account
- Max Units Per Punch (optional) – Enter if the employee may not exceed a maximum number of billing units in one shift
- Start Date (optional) – If a date is entered, the employee will not be able to make a punch before this date.
- End Date (optional) – If a date is entered, the employee will not be able to make a punch after this date.
- Account Reference (optional) – Optional reference field
- Grace Period – Defaults to disabled. By clicking enabled, the grace period for a certification template that is linked to this service account will be permitted.
- Grace Period Expiration – The date the grace period will expire based on the time frame associated with the linked certification template
- Allows OverLapping Over Lapping Pay Rates box – Check to allow
- Status – Defaults to active. Switch to inactive when this is no longer a valid service account.
- True Clock In-Out box – Select to allow real-time entries only. If not selected, historical entries can be entered.
- Click Save to continue and Yes to confirm
...
- Log in to DCI with personal profile
- Click Home on the main menu
- Click one of the following tabs on thesubmenu the sub menu to open the object page
- Employees – Shows all entries by employee
- Clients- Shows all entries by client
- Residential Programs– Shows all entries for the program (excludes punches not made within the program such as Training, Admin, Hourly, etc.)
- Cost Centers- Shows all entries by cost center
- Use the filters to search by specific criteria
- Click Search
- Select the object by clicking anywhere in the row
- Select the Entries tab on the object details page
- Select Residential Program from Select Account Type filter
- Click Search
- Export entries by clicking the Export button above the entries table on the right-hand side of the page
- Open the .csv file from the device downloads
- Excel will open
- Sort and format downloaded data as needed
- Click anywhere in the entry row on the entries table to view details
- Click Actions
- Select Approve or Reject from the drop-down menu
...
- Log in to DCI with personal profile
- Click Home on the main menu
- Click Employees on the submenu
- Enter the employee name in the Employee Name field then click Search
- Click anywhere on the row to open the employee details page
- Select the Entries tab located below the demographics box
- Select Residential Program from Select Account Type filter and select Unverified from Select Status filter
- Click Search
- Click anywhere in the row to open the punch details page
- In the Punch Details widget box, select either the Verify or Reject button by the Status field
- Click Yes to confirm
Scheduling (Instance-Level Setting)
Description: In this topic supervisors will learn how to use the scheduling system. This module is an instance-level setting and is not utilized by every organization.
- Create a schedule specifically for the residential program
- View all employee shifts using the Employee Schedule tab
- Prevent scheduling overtime and over authorization
- Prevent double-scheduling of employees
- Allow efficient management of shift swapping
- Manage employee availability templates
Create New Residential Program Schedule
- Log in to DCI with personal profile
- Click Scheduling on the main menu
- Click Residential Programs on the submenu
- Search for the program by typing the name in the field Type Residential Program Name and selecting it when it populates
- Click Search
- Select the program from the table by clicking anywhere in the row
- Click the Employees Schedule tab
- All employees with an active service account for the specified program will be listed in the left header column of the schedule table
- If a particular employee is not listed, verify that they have an active service account.
- The number of consumed weekly hours, scheduled weekly hours, and max available weekly hours will appear under each employee’s name.
- To create a new schedule, use the calendar or arrow icons to go to the desired week.
- To copy the same schedule as the previous week, click the Copy icon (two pieces of paper).
- SelecttheSelect the week to copy from the drop-down and click Ok
- Click Yes to confirm
- To create a new schedule shift, click the blank cell to open and complete the schedule form wizard:
- Employee Name – Auto populates with the employee name of the selected cell
- EVV Location – Select from the drop-down menu
- Day – Auto populates the date of the selected cell but can click in the field to open the calendar and select a different date
- Start Time – Click in the field to select a shift start time
- End Time - Click in the field to select a shift end time
- Note – Optionally add a note for the employee
- OnCall checkbox – Check if this is an on-call shiftIf selected, proceed to step 16.
- Critical checkbox – Check to mark a shift as critical
- Reminder - Enter a numeric value in minutes, hours, days, or weeks
- Reminder Type - Select Minutes, Hours, Days, or Weeks from the drop-down
- Click Schedule and Save to confirm
- Repeat until the schedule is complete
- Copy entries by dragging and dropping them into a new cell
- Click Publish to make the schedule visible to employees
- Review exceptions and make changes as needed
- Click Publish on the exceptions window
- Changes can be made to the schedule by right-clicking on individual entries
- Re-publish the schedule for the employee to view the changes
- To copy the same schedule as the previous week, click the Copy icon (two pieces of paper).
...
View Residential Program Schedule
- Log in to DCI with personal profile
- Click Scheduling on the main menu
- Click Residential Programs on the submenu
- Search for the program by typing the name in the field Type Residential Program Name and selecting it when it populates
- Click Search
- Select the program from the table by clicking anywhere in the row
- Click the Employee Schedule tab
- All employees with an active service account for the specified program will be listed in the left header row of the schedule table
- There are several numbers listed by each employee. Hover over each number to view what it represents.
- The first number is consumed weekly hours. This is the total of all pending and approved punches for the employee for the week.
- The second number is scheduled weekly hours. This is the total hours of saved shifts for the week.
- The third number is max available weekly hours, which is set on the authorization. A warning will display if an attempt to schedule over the max available weekly hours.
- The default view is a weekly view. To view an hourly view of one day, click Day or click Today to view today’s schedule. To return to the Week view, click Week.
- Navigate to other weeks by using the arrows or the calendar icon
- Each shift will display the start time, end time, and total hours.
- On-Call Shifts - Appear in dark blue
- Scheduled Shifts (published) - Appear in light blue
- Offered Shifts - Appear in yellow
- Unpublished Changes - Appear in green
- Deleted Unpublished Changes - Appear in bright red
- There are several tools available to quickly make changes to the schedule
- Trash icon - Clear the current schedule
- Copy icon - Copy the schedule from a previous week
- Printer icon – Print the schedule
- Right-click on any schedule entry and select
- View - View details
- Edit - Edit the entry
- Delete - Deletethe Delete the entry
Shift Swapping – View, Approve, and Reject Requests
Description: Employees can offer published shifts if they are unable to work the scheduled shift. Another employee with an active service account for the same residential program can claim the shift. If no one claims an offered shift, it will revert to the original employee’s schedule.
...
- Log in to DCI with personal profile
- Click Scheduling on the main menu
- Click Pending Approvals on the submenu
- The table will list all shift swap requests for the cost centers for which the user has the supervisor role
- Review the details of the shift swap in the table including:
- Client/Program
- Service Code
- Initial Employee - Employee offering shift
- Claimed By - Employee claiming shift
- Shift Date
- Shift Timings
- Status
- Action
- In the Action Column, click A to approve the shift swap or the red R to reject the shift swap
- Action cannot be taken until an offered shift has been claimed by another employee
- In the schedule, the entry will change from a yellow offered entry to a light blue published entry.
- Both employees will be notified that the supervisor has reviewed the shift swap if the message template is enabled
Review Employee Availability Template
Description: Employees can create availability templates so that supervisors know when they are available to work. Availability templates must be approved by a supervisor upon creation and when a template is updated. If the template is approved, supervisors cannot schedule an employee outside the hours of their approved availability template.
- Log in to DCI with personal profile
- Click Scheduling on the main menu
- Click Availability Templates on the submenu
- Use the filters to find the desired employee’s availability templates, or simply scroll through the table.
- Click anywhere in the row to open the Availability Template Details page
- After reviewing the template, return to the Availability Templates page.
- Click the A to approve the template or the red R to reject the template
- Please note: If the template is approved, supervisors cannot schedule an employee outside the hours of their approved availability template.
- Return to the Availability Templates page at any time to view an employee’s availability
Reports
Description: There are several scheduling reports regarding the residential program available to supervisors:
...
- Click Reports on the main menu
- Hover over Scheduling Reports on the submenu
- Select a report from the flyout menu
- Use filters or click Search to populate all data
- Drag and drop column headers into the order of choice
- Click Download to open the download report wizard
- Columns tab:
- Use the arrows to move items from the available columns to the selected columns
- Reorder columns as needed by dragging and dropping the item into place
- Click Next
- Options tab:
- Format – Select the download file format. Choices include Excel, PDF, CSV, and Tab Delimited.
- If PDF is selected, the Orientation field will become available. Select Portrait or Landscape.
- Save as Report Download Preference box – If checked, DCI will save the format and orientation preferences for subsequent downloads.
- Click Download and Yes to confirm
- Format – Select the download file format. Choices include Excel, PDF, CSV, and Tab Delimited.
- Click the downloaded file to open
- Enable editing and use data as needed
- Columns tab:
Message Templates
Description: Message templates are automated messages and notifications that, if enabled, are sent to users based on specific events or triggers within the system. Message templates can only be edited by a super user. They are split into two categories, messages and notifications. For more information on message templates, visit the help center. The following message templates are available for the scheduling module:
- Schedule Published
- Offered Shift
- Shift Claimed Employee
- Change in Published Schedule
- Scheduling Notify Upcoming Shift Reminder
- Scheduling Notify Failure to Punch
- Schedule Entry Rejected
- Unscheduled Punch
- Availability Template reached initial reminder deadline
- Availability Template reached reminder deadline frequency
Related articles
| Content by Label | ||||||||||||||||||
|---|---|---|---|---|---|---|---|---|---|---|---|---|---|---|---|---|---|---|
|