Description: In this topic, the user will learn about EVV Locations and how to enter a punch via the mobile app or web portal.
The EVV Locations functionality is a way to specify and record approved work locations per Electronic Visit Verification requirements
The EVV Location drop-down will appear on the punch entry form if the user is required (per company requirements) to specify where the shift was worked
The supervisor or employer will create approved work locations prior to the user entering a shift
These work locations will appear in the EVV Locations drop-down field on the punch entry form
Select the location where service was provided for clock in and clock out
Role Required: Employee
Permission Required: N/A
EVV Location drop-down may appear on the following punches:
Hourly punches
On the punch entry form via Web Portal or Mobile Web
Listed as Clock In EVV Location and/or Clock Out EVV Location
Upon Clock In and/or Clock Out via Mobile App
Residential program Clock In and Clock Out
Day program Clock In and Clock Out
Parenting program punches
Group service punches
Clock In with EVV Location on the Mobile App
- Open the DCI app
- Log in to personal profile
- Click the blue Clock In button on the dashboard
- The Clock In button will not display if there is an open shift
- If the Continue to Clock Out button is displayed this means the user did not clock out of the last shift and must clock out before clocking in again
- The Clock In button will not display if there is an open shift
- Complete Clock In
- Client - If the user has only one Client, this field will auto-populate. If the user has more than one Client, they must click on the field to select the client from the list.
- Service Code - If the user has only one Service Code, this field will auto-populate. If the user has more than one Service Code, they must click on the field to select the service code from the list.
- Cost Center - Cost Center will auto-populate
- Click Continue
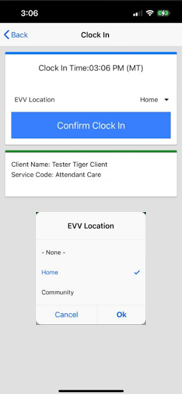
- Select the EVV location from the drop-down in the pop-up box
- Click Confirm Clock In to complete the clock in process
- This screen will display a summary of the clock in, including the authorization remaining balance if enabled.
Clock Out with EVV Location on the Mobile App
- Open the DCI app
- Log in to personal profile
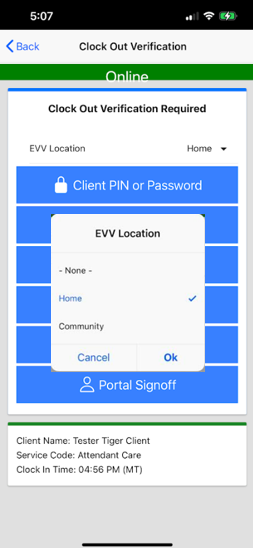
- Click the blue Continue to Clockout button
- Click Confirm
- Select the EVV location from the drop-down in the pop-up box
- Select the Client Verification Method
- Options are determined by the organization but may include: Pin or Password, E-Signature, Picture, Voice, and Portal Sign-Off
- Add optional notes or attachments
- Follow the organization’s requirements regarding notes
- Add Attachment allows the user to take a picture and add it to the note
- Click Confirm Clock Out
- The shift details will be displayed. Click Home to return to the Dashboard.
Enter a Punch with EVV Location in the Web Portal
- Log in to personal profile
- Click the blue Add Entry button on the Dashboard
- Complete the Add New Entry form wizard
- Entry Type: Punch is the default but other options may be available based upon the organization
- Employee Name: Prefilled with name of the employee logged into the system. This field is not editable.
- Account Type: Available options will depend upon authorizations
- Client: Enter the client's name and then select it from the list
- Service Code: The service code(s) authorized for the client. Select the one that is most appropriate for the service rendered.
- Service Date: The date the service took place
- Remaining Balance: This is specific to the client and appears after the name is selected. It shows how many hours or units are remaining on the authorization if this is enabled for the organization.
- Check In/Check Out: Enter the clock in/clock out times
- EVV Method: The options include Portal Signoff or FOB if enabled for the organization
- Clock in EVV Location: Select where the service was performed. There may be one or more options available depending on the client.
- Clock out EVV Location: Select where the service was performed. There may be one or more options available depending on the client.
- Check Out Date: This field is tied to the service and cannot be edited
- Diagnostic Code: Enter ICD-10 code (optional)
- Notes: Enter notes per the organization’s requirements (optional)
- Attachment: Select to attach a file (optional). Examples include receipts, photos, etc.
- Click Save to continue and Yes to confirm

Related articles