Description: In this topic, the user will learn how to create employee service accounts. In order for employees to make punches, they must have an active service account linking them to the particular service they are performing. The service accounts must be created for the employee by their supervisor or another designated administrator.
*Please note: Cost Center and Employee Profile must be created prior to the Employee Service Account. For hourly and client transportation service accounts, the Funding Source, Service Code, Client Profile, and Client Funding Account must be created prior to the Employee Service Account. Employee Service Accounts added cannot be deleted, but the status may be changed to inactive when making edits in the form wizard.
Role Required: Super User, Supervisor role for the cost center of the employee
Permission Required: N/A
Create an Employee Service Account
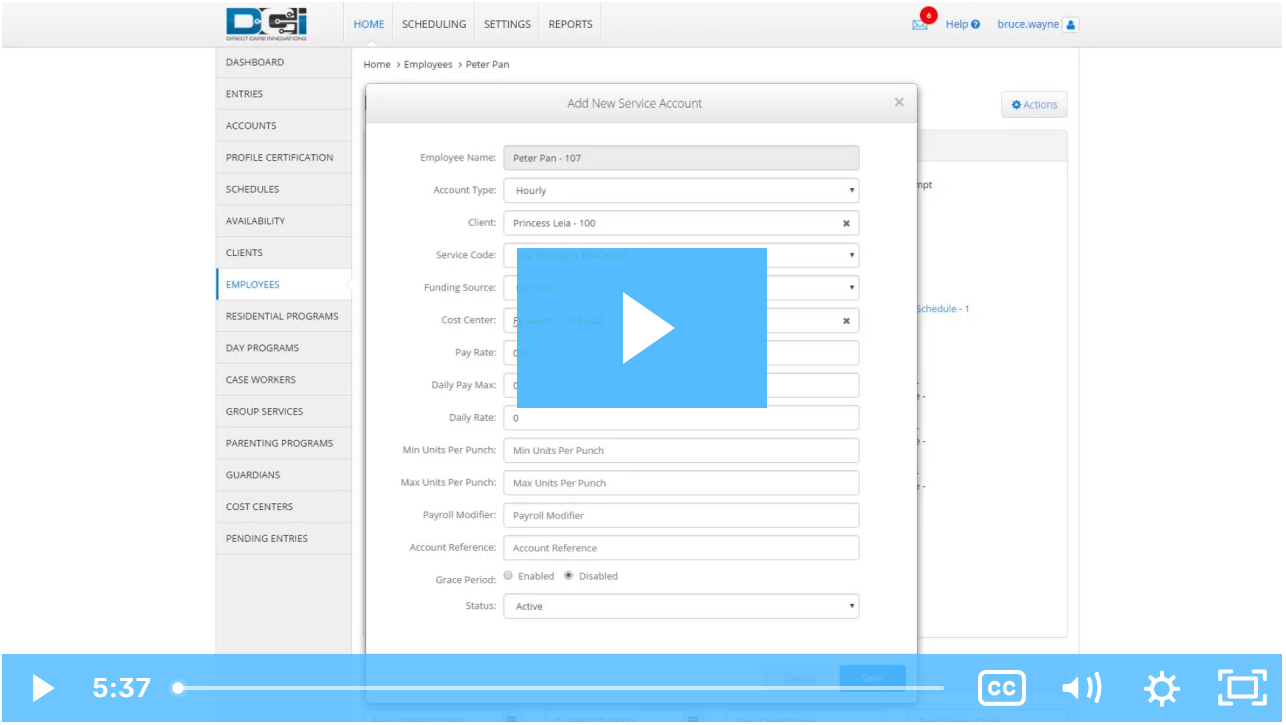
Log into DCI
Click Home on the main menu
Click Employees on the submenu
Search for and locate the employee
Click anywhere in the row to open the Employee Details page
Click Actions
Select New Service Account. Complete the form wizard.
Account Type (required): Select the account type associated with the appropriate service code
Hourly/Client Transportation
Client (required): The client receiving service from the employee
Relationship Type (required): Employee’s relationship with the client
Service Code (required): The system generates drop-down options based on the client’s name
Funding Source: The system generates drop-down options based on the client’s name
Funding Type: System auto-populates
Dollar funding type only
Burden Multiplier (required): The percentage of the pay rate that must be added to account for all associated fees. Enter as a decimal.
Cost Center (required): The cost center in which the employee will provide the service
Employee Number (optional): Recommended for use when an employee can work for multiple employers and has a unique employee number for each
Pay Rate Name (required)
Pay Rate (optional): Defaults to 0. If the client has a unique pay rate, it will default to that pay rate. This number can be changed if there is a unique pay rate for this service account.
Effective Date (optional): The date the pay rate is effective
Daily Pay Max (optional): Enter if the pay rate will switch to daily after a set number of hours
Daily Rate (optional): Required if a daily pay max is entered
Min Units Per Punch (optional): Enter if a minimum number of billing units must be used when the employee clocks in under this service account
Max Units Per Punch (optional): Enter if the employee may not exceed a maximum number of billing units in one shift
Start Date (optional): If a date is entered, the employee will not be able to make a punch before this date.
End Date (options): If a date is entered, the employee will not be able to make a punch after this date.
Payroll Modifier (optional): Used for extra pays
**Account Reference (optional)
Grace Period: Defaults to disabled. By clicking enabled, the grace period for a certification template that is linked to this service account will be permitted.
Grace Period Expiration: The date the grace period will expire based on the time frame associated with the linked certification template
EVV Exempt: Yes or no options, defaults to no.
Allow Overlapping Pay Rates: Check this box to allow overlapping pay rates
See Pay Rates Guide for details
EVV Frequency Type (Hourly Only): If the service code is set to require EVV, this field is required.
Case manager (optional)
Status: Defaults to active. Switch to inactive when this is no longer a valid service account.
Administration/Drive/Training/Vacation/Sick/Holiday
Cost Center (required)
Pay Rate Name (required)
Pay Rate (optional): Defaults to 0. This number can be changed if there is a unique pay rate for this service account.
Min Units Per Punch (optional): Enter if a minimum number of billing units must be used when the employee clocks in under this service account
Max Units Per Punch (optional): Enter if the employee may not exceed a maximum number of billing units in one shift
Start Date (optional): If a date is entered, the employee will not be able to make a punch before this date.
End Date (options): If a date is entered, the employee will not be able to make a punch after this date.
**Account Reference (optional)
Grace Period: Defaults to disabled. By clicking enabled, the grace period for a certification template that is linked to this service account will be permitted.
Grace Period Expiration: The date the grace period will expire based on the time frame associated with the linked certification template
Status: Defaults to active. Switch to inactive when this is no longer a valid service account.
Residential Program/Day Program/Group Service/Parenting Program
All fields from Administration/Drive/Training/Vacation/Sick/Holiday
PTO
All fields from Administration/Drive/Training/Vacation/Sick/Holiday, and:
PTO Increment (optional): Enter if PTO can only be entered in a set increment (i.e., 8 hours)
Mileage
All fields from Administration/Drive/Training/Vacation/Sick/Holiday, and:
Payability: Defaults to payable. Change to not payable if the employee will not be paid for this service.
Click Save to continue and Yes to confirm
Alternatively, select Employee Service Accounts can be created from the Residential, Day, Group Service, or Parenting Program Page:
- Select the program type (Residential Programs, Day Programs, Group Services, or Parenting Programs) from the submenu
- Search for and locate the program
- Click anywhere in the row to open the program details page
- Click Actions
- Select New Employee Service Account from the drop-down menu
- Repeat steps 7-8 above
Click the video below to launch the video player in a new tab.
Related articles