Description: In this topic, the user will learn how to navigate the DCI mobile app dashboard and menu as a supervisor.
Role: Supervisor
Permissions: N/A
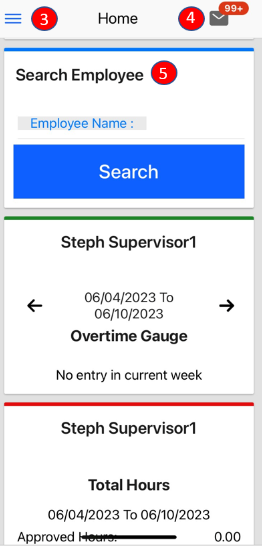
Dashboard
Log in to the DCI mobile app
Arrive at the dashboard (pictured below). To navigate within the app, use your fingers to scroll and click.
Menu - Click the three horizontal lines icon to open the menu options (see details below for each menu item)
Messaging Module - Click the envelope icon to access the DCI messaging module. Message certain members of your program or receive system-generated messages and notifications. For more information on the messaging module, please visit the Help Center.
Search Employee - Click to enter and select an employee. Click the blue Search button to view the Overtime Gauge and Total Hours widget for the selected employee. Click the blue Reset button to clear the results.
Overtime Gauge - Shows progress towards forty hours. It does not indicate overtime eligibility but provides a visual representation of hours worked in a week.
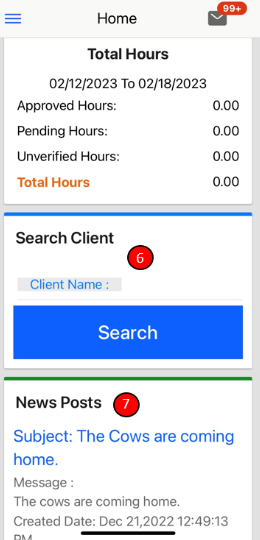
Total Hours Gauge - Displays a breakdown of the hours worked in a week. Hours are displayed in the following statuses:
Approved Hours - Approved and ready for payment
Pending Hours - Have been worked but still need to be approved
Unverified Hours - Entered on behalf of the employee by a supervisor or employer and must be verified by the employee before being approved for payment
Total Hours - Sum of all Approved, Pending, and Unverified hours.
Search Client - Click to enter and select a client. Click the blue Search button to view the Total Weekly Hours widget, showing how many hours of service the client received for the week by employee. Click the blue Reset button to clear the results.
News Posts - Displays important messages
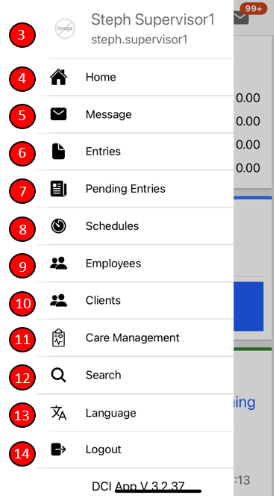
Menu
Log in to the DCI mobile app
Click the three horizontal lines icon in the upper left-hand corner to open the menu flyout options
Profile - Click Action to add a photo or signature
Home – Click to return to the dashboard
Message – Click to open the messaging module. Compose, view, and manage messages.
Entries – Click to access all time entries for the user
View the Managing Entries Guide in the Help Center for details
Pending Entries - Click to review and approve or reject employee entries
View the Managing Entries Guide in the Help Center for details
Schedules – Click to access the user's schedule. Only active if the scheduling module is enabled for the program.
Employees - List of employees in the instance
Access employees associated with the user by clicking on the employee's name to open the details page
Clicking on employees who are not associated with the user will return an alert box stating that the user does not have permission to access detail
Clients - List of clients in the instance
Access clients associated with the user by clicking on the client's name to open the details page
Clicking on clients who are not associated with the user will return an alert box stating that the user does not have permission to access detail
Care Management – View details of active clients with Care Management enabled, pending care notes, and published care notes. Only active if the care management module is enabled for the program.
The user may only access associated client information
Clicking on clients who are not associated with the user will return an alert box stating that the user does not have permission to access detail
Search – Click to search by messages, clients, employees, or entries.
Language - Click to select preferred language. Only active if multi-lingual is enabled for the program.
Logout – Click to logout and return to the login page
Please note: The user will automatically be logged out after a certain period of time (determined by the organization)
Related articles