Click the link below to download the Voucher Data Adapter Tool (Excel).
OR PTC DCI Voucher Data Adapter for MOCHA.xlsx
Click the link below to view the instructions for how to use the Voucher Data Adapter Tool for MOCHA.
Instructions for Voucher Data Adapter for MOCHA.pdf
Voucher Data Adapter Instructions
Description: Follow these steps to save a significant amount of time entering HCW time entry data into DHR/mainframe (also called Mocha). You can use the Voucher Data Adapter spreadsheet to prepare OR PTC DCI data for copying and pasting into the mainframe in only a few steps.
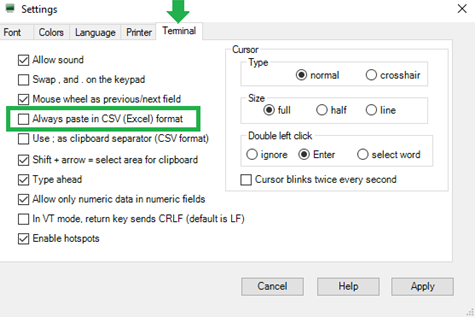
Important: In order for this process to work, you may need to change a setting in mainframe: Tools > Options > Terminal tab > turn “Always paste in CSV (Excel) format” OFF.
Getting Started
Turn off “Always paste in CSV (Excel) format” in mainframe
Note: Your version of the mainframe may not have this feature available if running a version earlier than 2.5 |
|
Layout of the Voucher Data Adapter spreadsheet
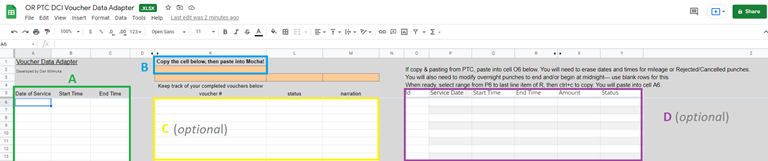
A - Primary place to paste data from the OR PTC DCI payroll batch, with columns for Date of Service, Start Time, and End Time.
B - Result of formulas that transform the data to make it compatible with the mainframe. The 3 orange boxes below the area highlighted in blue are used instead if the amount of data takes up more than one screen on the HPAY > STIM screen in the mainframe.
C (optional) - Record your progress here, if you wish to keep track of the vouchers you’ve paid.
D (optional) - This section is used as an optional workspace for proofreading data. For example, copy and pasting data from the OR PTC DCI web portal allows you to modify it as needed here.
Duplicate the “blank” sheet and rename it
Open the Voucher Data Adapter, and look near the bottom of the screen. Right-click on the sheet titled “blank”, then...
If using MS Excel, select Move or Copy. On the following pop-up window, check the box for Create a copy.
If using Google Sheets, select Duplicate.
Right-click the copied sheet and rename it if desired. Renaming it to your own name will be helpful if multiple people are using the spreadsheet at the same time in Google Drive.
Note: These steps are recommended for the purpose of always having a backup original in case something goes wrong later. Certain actions like copy & pasting too many columns of data can break the formulas, and you’ll need to either repeat these steps to make a new blank sheet, or download the Voucher Data Adapter from the SPD Tools OR PTC DCI information web page: http://www.dhs.state.or.us/spd/tools/cm/PTC/index.htm.
Simplified Instructions - Batched Data
1. Navigate to your batched data. In most cases this will be an Excel file.
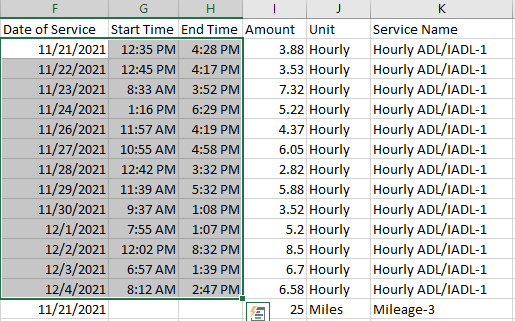
2. Left-click and hold down the range you wish to use, selecting 3 columns: Date of Service, Start Time, and End Time. Do not include the date(s) from mileage.
Note: You can include blank rows without issue.
3. When the correct data is highlighted, press ctrl+c to copy. |
|
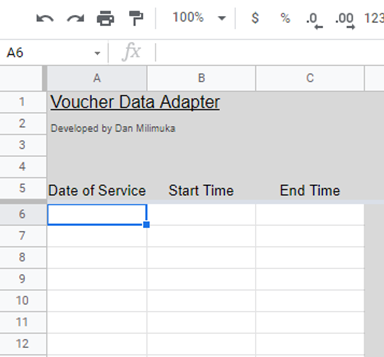
4. Navigate to the Voucher Data Adapter, and click once on cell A6.
5. Press ctrl+v to paste. |
|
6. After the time entries for this voucher are entered, you’ll notice a long string of numbers in the orange cell to the right, K2. Click once on cell K2.
7. Press ctrl+c to copy.
Note: If there are many time entries that require more than one STIM screen of data, they will appear in the orange boxes below K2, cells K3, J3, and L3. You will repeat steps 8-10 for each screen of STIM using these respective cells. |
|
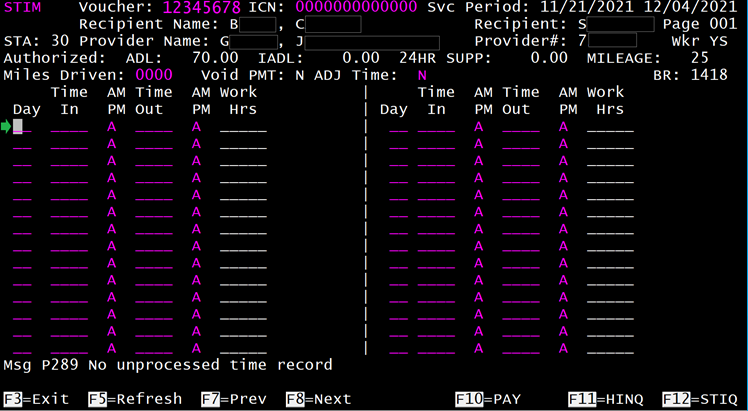
8. Open the mainframe, and navigate to the voucher’s HPAY > STIM screen.
9. Click on the first blank node, where the first digit of the date is typically entered.
10. Press ctrl+v to paste. Note: If only a small portion of the data appears, follow steps in the Getting Started to correct this. | |
11. Enter the mileage claimed, if any. This needs to be entered manually.
12. Press enter to confirm the data, F9 to save, then F10 to pay if the hours do not exceed the HCW’s authorized hours limit.
Note: Batched data typically does not exceed the HCW’s authorized hours. If it does, use the OR PTC DCI Hours Converter spreadsheet found on this page to automatically calculate which time to enter in mainframe and PTC.
DONE! |
|

Adjusting For Pending Entries and More
It is recommended you become comfortable with the Simplified Instructions first before moving on to this section.
|
|
4. Above this table is a description of what to do next. In this case, all that is needed is to select the 3 columns of data, from the first time entry’s service date to the last time entry’s end time, then press ctrl+c to copy.
Note: The section to the right of this table (column Z) will give you warnings if there are time entries that need to be excluded. | |
5. Select cell A6 on the far left margin of the sheet, then press ctrl+v to paste. Then follow the same steps described in the Simplified Instructions section, steps 6 through 11. | |
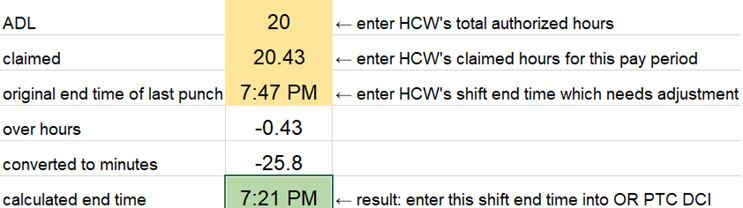
6. In this case, the pending entry was not processed because it goes over the HCW’s authorized hours limit. As shown below, the OR PTC DCI Hours Converter shows what time to correct this to in the mainframe.
Note: Due to differences in how mainframe and PTC round values when calculating the time, this tool will sometimes show a number that is one minute off.
|
|

Developed and authored by Dan Milimuka
Related articles